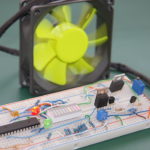
Temperature Controlled Fan
Here is another fan controller design based on PIC microcontroller, this time it's temperature controlled and can be used to monitor Hard Drive temperature and adjust the fan speed accordingly or as a case fan controller. This post following recently ...
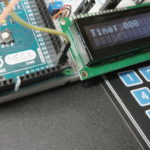
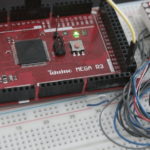
LCD Countdown Timer Arduino
This post is about building a 3-digit countdown timer based on Arduino MEGA. Up/Down counter also available at this link. The timer will wait for 3-digit number to be entered via 4x3 keypad and then start counting down to zero ...
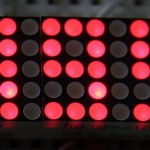
3.5 Digit Dot Matrix LED Display
In this post I'll show you how two QDSP-L149 5x7 dot matrix LED Displays can be used to create a 4 Digit display module. The trick is to change the roles of rows and columns. So now each 5x7 Dot ...
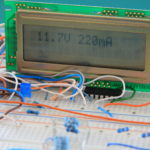
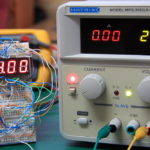
Power Supply 2.5 – 12 V
Power Supply is probably the most common electronics project you can build.This is a basic design for digital power supply. It was built around 3 main components. Digital potentiometer – MCP4251-502E/P, Low Dropout Voltage Regulator – MIC29152 and PIC16F877A.The idea ...
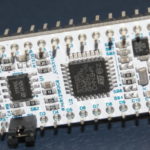
LED Blinking STM32L011K4
All my previous project were based on PIC microcontrollers or Arduino board, however recently I’ve been experimenting with STM32 MCU. For this simple project a NUCLEO board based on STM32L011K4 MCU was used. The STM32 Nucleo-32 board provides a simple ...
Simple Digital Voltmeter
Simple digital voltmeter can be built by using PIC microcontroller and a few discrete components. PIC16F877A 10 bit ADC module was used for this purpose, we’ll work only with 8 upper bits to translate input voltage to digital form and ...
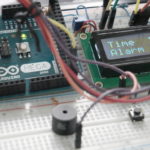
LCD Digital Alarm Clock Arduino
Digital Alarm Clock based on Arduino MEGA board and 2x16 LCD display is the topic of this post. Similar design based on Raspberry Pi can be found at this link. For PIC16F877 version click here. This design should also work ...
10Bit 7-Segment Digital Voltmeter 0-24V
This is an upgrade to recently published Simple Digital Voltmeter.Few improvements were done to hardware and software.DVM operating range was slightly increased up to 24 V Max, however the most significant change is that the code now uses full 10 bit of ...
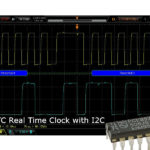
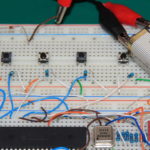
PCF8573P I2C Real Time Clock
In this post I’m going to show you how to interface an I2C Real Time Clock – RTC with PIC microcontroller. Only a basic hardware configuration and a communication protocol are presented here. I’m planning to extend it to a ...
8×8 LED Dot Matrix Display with Arduino
In this article I’m going to show you how an 8x8 LED Dot Matrix Display can be driven by MAX7219 with Arduino.There are 2 similar designs. PIC16F876 version is available at this link ,for circuit based on 74HC595 click here.For this project ...